
Organizing content on a webpage can sometimes be challenging, especially when you want to present multiple sections of information without making the page too long or cluttered. One effective solution is to use tabs, which allow you to group related content into separate sections that visitors can easily switch between.
Tabs are commonly used for FAQs, product descriptions, tutorials, pricing tables, and feature comparisons. Instead of displaying all the information at once, tabs allow users to click different headings to reveal specific content. This improves the overall user experience and keeps pages clean and organized.
If you are using WordPress, the easiest way to add tabs to your website is by using the Nasio Blocks plugin. This plugin extends the WordPress Block Editor by adding a collection of advanced blocks that help you build modern layouts without writing any code. One of these blocks is the Tabs block, which allows you to create interactive tabbed content directly inside the editor.
In this guide, you will learn how to add and customize tabs in WordPress using Nasio Blocks plugin.
Installing the Nasio Blocks Plugin
Before adding tabs to your website, you need to install the free Nasio Blocks plugin. This is a lightweight plugin that enhances the WordPress Block Editor by adding additional Gutenberg blocks that are not included in the default WordPress installation. The plugin is optimized for speed and ships with additional Gutenberg blocks like icons, accordions and others but you can switch on and off blocks to maximize efficiency.
Nasio Blocks is a free plugin that also has a premium version with additional features but the free version is more than enough in order to have tabbed content on your site. The plugin is designed to make page building easier by providing flexible content blocks that work seamlessly within the editor.
To install the plugin, follow these steps:
- Log in to your WordPress Dashboard.
- Navigate to Plugins → Add New.
- In the search bar, type Nasio Blocks.
- Click Install Now.
- After installation is complete, click Activate.
Once activated, the plugin will add several new blocks to your editor, including the Tabs block.
Adding the Tabs Block
To start using tabs, open the WordPress Block Editor by editing an existing page or creating a new one.
From the WordPress dashboard, go to Pages and either click Add New Page or edit an existing page. When the editor opens, click the Add Block (+) button and search for Tabs.
Select the Tabs block, and it will be inserted into your page. By default, the block comes with three tabs labeled:
- Tab #1
- Tab #2
- Tab #3
Each tab contains its own content area where you can add text, images, lists, or other blocks. You can easily rename the tab titles and customize the content inside each tab.
Managing Tab Settings
As with all Nasio Blocks, the customization options for the Tabs block are divided into two main tabs: Settings and Styles.
To access these options, make sure the Tabs block is selected in the editor. The settings will appear in the panel on the right side of the screen.
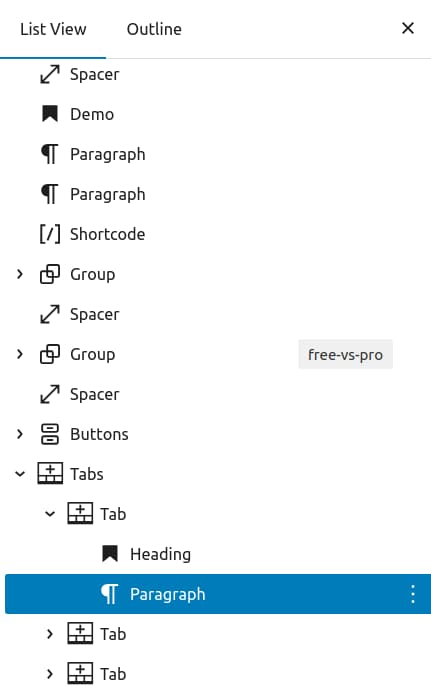
If you are working with a complex layout, it can sometimes be difficult to select the correct block with the mouse. For this reason, it is recommended to use the Document Overview button located at the top-left side of the editor. This feature displays a list of all blocks on the page and makes it much easier to select the Tabs block quickly.
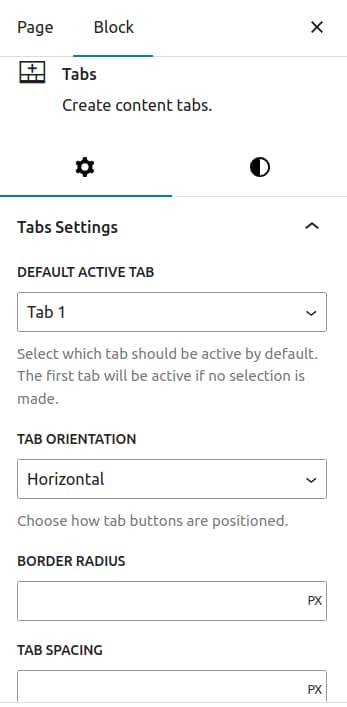
Tabs Settings
The Tabs Settings section controls the behavior and layout of the tab items.
One of the most important options is Default Active Tab, which allows you to choose which tab should be open when the page first loads. This is useful if you want visitors to see a specific section by default.
Another option is Tab Orientation, which allows you to display the tab buttons either horizontally or vertically. This feature is available in the premium version and can help you adapt the tab layout to different page designs.
You can also adjust the Border Radius of the tab buttons, allowing you to create rounded edges that match your website’s design style.
The Tab Spacing option lets you control the spacing between the tab buttons, making it easier to create a clean and balanced layout.
Styles
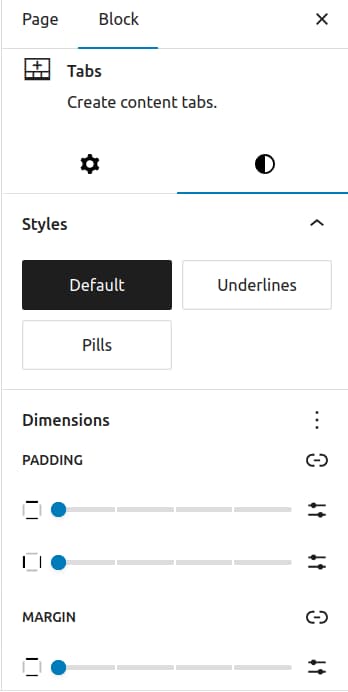
The Styles tab allows you to customize the visual appearance of the tabs.
You can choose from several Tab Button Styles, including:
- Default button style
- Text underlines
- Pill-style buttons
These styles allow you to match the tabs with the overall design of your theme.
Additional customization options include adjusting the padding and margin of the tab buttons to control spacing.
You can also customize the colors used for the tab titles, including:
- Tab title background color
- Tab title text color
- Active tab title background color
- Active tab title text color
These settings allow you to highlight the active tab and make the navigation more visually clear for users.
Benefits of Using Nasio Blocks
The Nasio Blocks plugin offers a simple yet powerful way to extend the WordPress Block Editor. Instead of relying on multiple plugins or complex page builders, Nasio Blocks integrates directly with the Gutenberg editor and provides flexible design elements.
Some key benefits of using Nasio Blocks include:
- Additional advanced blocks for layout and content
- Easy drag-and-drop editing inside the WordPress editor
- Fully responsive elements that work on mobile devices
- Flexible customization options for styles and layouts
With these features, Nasio Blocks makes it easier to create professional-looking pages without needing technical expertise.
Final Thoughts
The Tabs block is a great tool for organizing content and improving the readability of your WordPress pages. By grouping information into interactive sections, you can keep your layout clean while still providing detailed information to your visitors.
Using the Nasio Blocks plugin, you can quickly add and customize tabs within the WordPress Block Editor. Whether you are building an FAQ section, product page, or tutorial guide, tabs provide a simple and effective way to structure your content and enhance the user experience.